Managing Forms with useActionState
In this tutorial, we will learn how to build modern, server-powered forms using useActionState. This hook replaces old form-handling patterns like onSubmit, manual fetch requests, and custom loading states.
Why useActionState?
Before React 19 and Server Actions, you had to:
- Write
onSubmithandlers - Manually call
fetch - Prevent default behavior
- Track loading manually
- Update UI state after receiving a response
This caused lots of repetitive code.
With useActionState:
- Next.js sends the form data to a Server Action for you
- It stores the server’s response automatically
- It re-renders your component when the Action finishes
- No custom handlers needed
This makes form handling drastically simpler and more predictable.
Step 1: Create a Server Action
useActionState always works together with a Server Action.
Create a file in your app directory:
app/actions/saveUser.js
Add:
"use server";
export async function saveUser(previousState, formData) {
const name = formData.get("name");
console.log("Saving user:", name);
return { message: `Saved user: ${name}` };
}This Action:
- Runs on the server
- Receives form data
- Returns a new state object
useActionState will store that object in the UI.
Step 2: Use useActionState in a Component
Now, let's create a page to use this action.
app/page.js
Add this component:
"use client";
import { useActionState } from "react";
import { useFormStatus } from "react-dom";
import { saveUser } from "./actions/saveUser";
export default function UserForm() {
const [state, action] = useActionState(saveUser, { message: "" });
return (
<div className="p-8">
<h1 className="text-xl font-bold mb-4">Managing Forms with useActionState</h1>
<form action={action} className="space-y-4 max-w-md">
<input
name="name"
placeholder="Enter your name"
className="border p-2 rounded w-full text-black"
/>
<SubmitButton />
</form>
<p className="mt-4 text-green-600">{state.message}</p>
</div>
);
}
function SubmitButton() {
const { pending } = useFormStatus();
return (
<button
disabled={pending}
className="bg-blue-600 text-white px-4 py-2 rounded disabled:bg-gray-400"
>
{pending ? "Saving..." : "Save User"}
</button>
);
}Note on "use client":
Because useActionState is a hook, this component must be a Client Component. That is why we add "use client" at the top of app/page.js.
How useActionState Works
1. Initial State
useActionState(saveUser, { message: "" })
This gives your component initial UI state.
2. Form Submits
When the user submits the form, React sends form data to saveUser.
3. Server Runs the Action
The Action returns { message: "Saved user: NAME" }.
4. UI Updates Automatically
React stores the returned object in state.
You get:
<p>{state.message}</p>updated with the latest message. No manual handlers. No fetch calls. No event handling code. Next.js does the work for you.
Step 3: Understanding Action + UI Flow
Here’s the lifecycle:
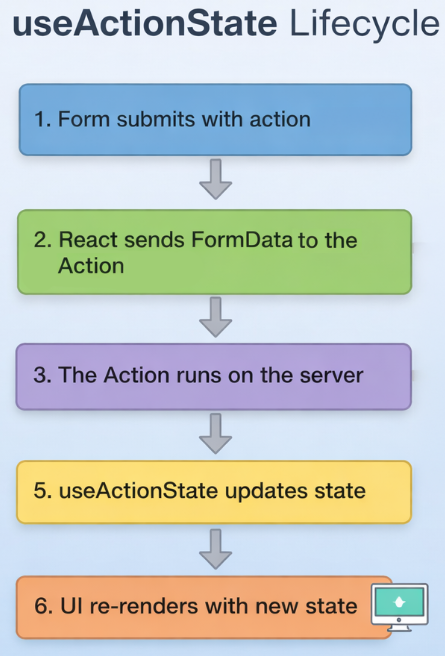
This is why React 19 removes the need for manual form logic: the entire lifecycle is automatic.
Step 4: Loading States with useFormStatus
useFormStatus() gives you:
pending— whether the Action is runningdata— the last submitted form data
Example in the tutorial:
<button disabled={pending}>
{pending ? "Saving..." : "Save User"}
</button>You get smooth transitions without writing extra state or event handlers.
Step 5: Returning Validation Errors or Results
Your Action can return any shape of state.
Example:
"use server";
export async function saveUser(previousState, formData) {
const name = formData.get("name");
if (name.trim() === "") {
return { error: "Name is required" };
}
return { message: `Saved: ${name}` };
}Component:
<p className="text-red-600">{state.error}</p>
<p className="text-green-600">{state.message}</p>Everything stays predictable and declarative.
Step 6: More Advanced Form Example
Multiple fields + Action state management
app/components/ProfileForm.js
"use client";
import { useActionState } from "react";
import { useFormStatus } from "react-dom";
import { updateProfile } from "../actions/updateProfile";
export default function ProfileForm() {
const [state, action] = useActionState(updateProfile, {
name: "",
email: "",
saved: false
});
return (
<div className="p-6 border rounded shadow max-w-md">
<h2 className="text-lg font-bold mb-4">Profile Form</h2>
<form action={action} className="space-y-4">
<input
name="name"
placeholder="Name"
className="border p-2 rounded w-full text-black"
/>
<input
name="email"
placeholder="Email"
className="border p-2 rounded w-full text-black"
/>
<SubmitButton />
</form>
{state.saved && <p className="mt-2 text-green-600">Profile updated!</p>}
</div>
);
}
function SubmitButton() {
const { pending } = useFormStatus();
return (
<button
disabled={pending}
className="bg-green-600 text-white px-4 py-2 rounded disabled:opacity-50"
>
{pending ? "Saving..." : "Update Profile"}
</button>
);
}And the Action:
app/actions/updateProfile.js
"use server";
export async function updateProfile(previousState, formData) {
const name = formData.get("name");
const email = formData.get("email");
return { name, email, saved: true };
}Here, the form manages multiple fields and shows a success message when done.
useActionState transforms the way you manage forms in Next.js. Instead of writing manual handlers and managing state by hand, React connects your UI directly to Server Actions and updates your components automatically. This reduces complexity, removes entire categories of bugs, and gives you a clean, declarative approach to handling user input.