Introduction to Actions
In this tutorial we will learn what Actions are in React 19, why they were introduced, and how they replace older form-handling patterns.
Up until now, we have been using Vite for our React projects. However, Server Actions are a feature that deeply integrates with the server. To fully leverage them with ease, we need a framework that supports server-side capabilities out of the box.
That is why we are switching to Next.js. Next.js has first-class support for React Actions (often called Server Actions), making it the perfect environment to learn this powerful new feature.
Setting up Next.js
To get started with Actions, let's create a new Next.js project. Open your terminal and run:
npx create-next-app@latest my-next-appWhen asked, you can select the defaults (Yes to TypeScript/ESLint/Tailwind, etc., or No if you prefer simple JavaScript). For this tutorial, we will keep things simple.
Once installed, navigate to the folder:
cd my-next-app
npm run devNow you have a running server-capable React environment ready for Actions!
What Are Actions?
Actions are functions that run on the server in React 19.
You create an Action when you need to:
- Save data
- Validate form input
- Update the database
- Authenticate a user
- Send an email
- Perform any server-side logic
React lets your UI call these Actions directly, without manually wiring up complicated API requests or old form handlers.
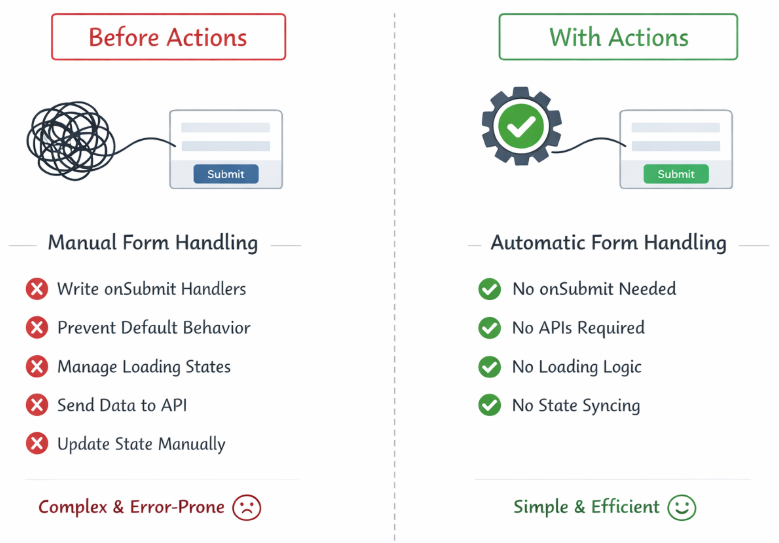
Why React 19 Introduced Actions
Before Actions, React developers had to manage forms manually:
- Writing
onSubmithandlers - Preventing default browser behavior
- Managing loading states
- Sending data to APIs
- Updating state manually after responses
This created complexity and bugs.
Actions solve these problems:
- No need for
onSubmit - No need for APIs for many cases
- No need for manual loading logic
- No need for manual state syncing
React now handles the entire lifecycle for you.
Creating Your First Action
An Action is a function marked with:
"use server";In Next.js, you can define these in a separate file or inside your component file (if it's a Server Component). For clarity, let's create a separate actions file.
Example:
app/actions/saveName.js
"use server";
export async function saveName(previousState, formData) {
const name = formData.get("name");
console.log("Server received:", name); // This runs on the server terminal!
// Simulate a delay
await new Promise(resolve => setTimeout(resolve, 1000));
return { message: `Saved: ${name}` };
}Important:
- The function runs on the server, not in the browser.
- You receive form data as a FormData object.
- You return the updated state back to the UI.
Connecting an Action to a Form
React 19 introduces the action prop on <form>, which replaces the old onSubmit pattern.
In Next.js, we use the useActionState hook to connect our Client Component to the Server Action.
app/page.js
"use client"; // This must be a Client Component to use hooks
import { useActionState } from "react";
import { useFormStatus } from "react-dom";
import { saveName } from "./actions/saveName";
export default function Home() {
const [state, action] = useActionState(saveName, { message: "" });
return (
<div className="p-10">
<h1 className="text-xl font-bold mb-4">Intro to Actions</h1>
<form action={action} className="flex flex-col gap-3">
<input
name="name"
placeholder="Enter your name"
className="border p-2 rounded text-black"
/>
<SubmitButton />
</form>
<p className="mt-4 text-green-600">{state.message}</p>
</div>
);
}
function SubmitButton() {
const { pending } = useFormStatus();
return (
<button
disabled={pending}
className="bg-blue-500 text-white p-2 rounded disabled:bg-gray-400"
>
{pending ? "Saving..." : "Save"}
</button>
);
}What's happening?
useActionState()connects UI state with the Action’s return value.- We added
"use client"because hooks only work in Client Components. - The
<form>automatically sends data to the Action on the server. - The UI updates after the Action finishes.
useFormStatus()gives you the loading state automatically.
We wrote no onSubmit. We wrote no event.preventDefault(). React handles everything.
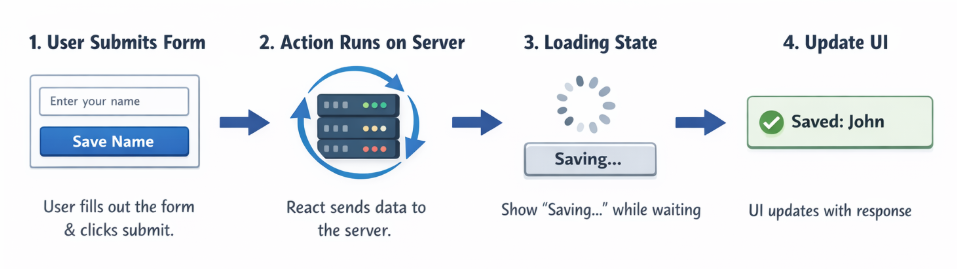
Understanding Action Transitions
When a form submits, React enters a transition, meaning:
- The action runs on the server
- UI is allowed to stay interactive
- React updates the UI when data returns
The hook useFormStatus() lets you show loading states during the transition.
This is useful for:
- Disabling buttons
- Showing spinners
- Updating text
- Providing user feedback
React now gives you predictable state during the entire lifecycle of an Action.
Why Actions Make React Simpler
Actions help you avoid:
- Manual form handlers
- Custom loading logic
- Syncing server changes with client state
- Sending fetch requests by hand
- Writing API endpoints for common cases
Instead, React connects your UI directly to your server functions.
Actions feel like “magic”, but they follow a simple rule:
Your UI describes the Action. React handles the execution.
Another Example: Submitting a Comment
app/actions/addComment.js
"use server";
export async function addComment(previousState, formData) {
const comment = formData.get("comment");
return { comment };
}app/components/CommentForm.js
"use client";
import { useActionState } from "react";
import { useFormStatus } from "react-dom";
import { addComment } from "../actions/addComment";
export default function CommentForm() {
const [state, action] = useActionState(addComment, { comment: "" });
return (
<>
<form action={action} className="space-y-3">
<textarea
name="comment"
className="border p-2 rounded text-black"
placeholder="Write a comment"
/>
<SubmitButton />
</form>
<p>Latest comment: {state.comment}</p>
</>
);
}
function SubmitButton() {
const { pending } = useFormStatus();
return (
<button disabled={pending} className="bg-blue-500 text-white p-2 rounded">
{pending ? "Posting..." : "Post Comment"}
</button>
);
}This shows how Actions easily manage form state and server updates with almost no extra logic.
Actions are one of the biggest improvements in React 19. They eliminate the need for manual form handling, reduce boilerplate, and make server logic feel like a natural extension of your UI. With Next.js handling the server setup, you can focus purely on building features.